Thursday, July 18, 2013

California dreaming

LEE ESTO EN ESPAÑOL
Hi everyone!
As you guys know, when I do anything that doesn't come out well, I simply try doing it again. That's something I've been saying since my very first post, that's how I am. After the awful experience I had last year with my rollerblades, today I tried skating again. But I didn't skate with an ordinary pair of roller skates... I finally got the colored skates that the whole Pinterest is craving for!! I had many doubts, but it was love at first sight and it was totally worth the risk. Today I went to Mission beach to try my new skates and I totally loved them!

Hope you guys like the pictures and my last last diy :)
Skirt: DIY (originally from H&M)
Roller Skates: Moxi Roller Skates
Bikini: H&M (2012)
DIY ALTERNATIVE
At first I thought of making a DIY, because they're not easy to find outside the US (and I normally live in Barcelona). My idea was to dye a regular pair of white skates with leather dye. It's so easy to find online, I got mine on Ebay. But in the end, as I had the chance of living in California for a few months, I bought my Moxi Strawberry skates.

The dye for shoes is not so difficult to use: just apply a few thin layers of dye with a sponge applicator, using smooth even strokes. It works well on smooth leather, patents, synthetics, canvas and satins. If you don't dare to make it, you can just take your skates to the cobbler.
Hope you guys liked the pictures. And stay tuned, I'm sure you guys are going to love this week's DIY ;)

xxx

Friday, June 21, 2013

DIY: Tatty divine inspired Sculpey necklace

Hi everyone!
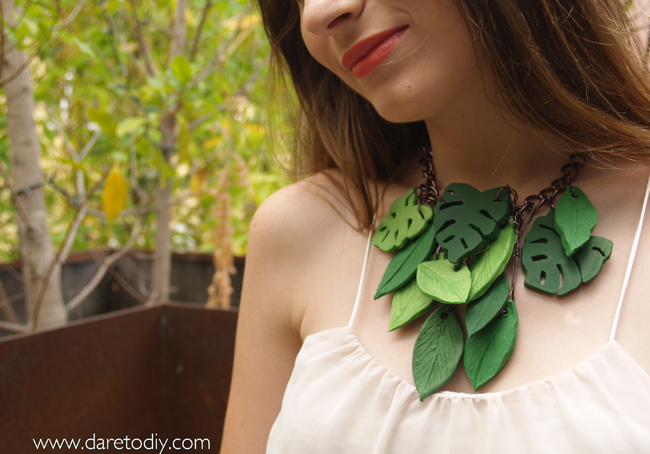
So here's my Tatty Devine inspired necklace. At first I thought of using some sort of plastic, but in the end I chose to use oven-bake clay because it's much easier to find and it's also very easy to work with. My biggest fear, when I started working on this project, was that it could look childish. And I do recognize it didn't came out as I expected on my first attempt. I struggled a little bit with the split leaves... But after trying some different techniques, I can give you some advice.

1. Try to use your fingertips as little as possible: It will be easier to achieve an even and flawless surface if you use modelling tools. You can buy some specific tools for clay, or you can use whatever you already have at home instead. I used a plastic cup, a cuticle remover, a wood stick and some pins and needles.

2. This colored clay might stain your working surface. You'd better work on metal or crystal surfaces.

3. Baking: Every brand has its own baking instructions. You'll usually have to bake your clay for 20-35 minutes, depending on how thick your pieces are. The oven must be preheated to 130ºC / 275ºF. Do not use the microwave!


THANKS FOR YOUR SUPPORT!
Hope you guys enjoyed and had a great time watching! Don't forget to send me pictures of your recreations, you can e-mail me (info@daretodiy.com), tag me on Twitter (@Daretodiy) or on Instagram (@sylvia_Daretodiy).

xxx

DIY Inspiration: Tatty Devine's pesrpex jewels

LEE ESTO EN ESPAÑOL
Laser cut is playing a big part in fashion during the last few seasons. Its great for making awesome drillings on leather and textiles (you guys can see examples here y here), but it also works well on thicker materials.

Some time ago I came across the british accessory Brand Tatty Devine, whose main identity symbol is, by the way, laser cut perspex. I absolutely love their eye-catching and out-of-the-box designs. I thought it would be worth it to share with you guys these surreal and lovely pieces... And of course, making a DIY inspired by them!
And now, you might be wondering... Where's the DIY in this?
Obviously, nobody has perspex and a laser cut machine at home. But there are some good alternatives that can provide really cool results. This DIY is going to be something new for me, I'm still not sure of what will come out of this idea... Hope it's not a DIY disaster!!

What would you do with this inspiration? How would you do it?

xxx

Saturday, June 15, 2013

Mini DIY: Tom Binns safety pin jewelry

This is not the first time I see safety pins on jewelry but I think the way the designer Tom Binns uses them is quite cool. I love the pop of color and the casual effect they provide to pearls and Swarovski crystals. Despite Binn's pieces are far from low cost, this inspiration is so easy to recreate. It's a mini DIY that requires no instructions.
Imágenes vía Net a Porter
A few safety pins, a little bit of spray paint and a boring necklace, that's all you'll need for this mini-DIY!

Seize the weekend!! 
xxx

Sylvia

Friday, June 14, 2013

How to make a maxi dress out of a long skirt

Hi everyone!!
In addition to a new DIY, this week we're having a very special guest. His name is White Boy, and he is one of the pets a friend has on his yard, in the middle of the dessert of California. I though that llamas weren't so friendly, but this one made me change my mind. He stole my heart with his fluffy hair and his buckteeth.

My maxidress is made of a basic skirt from Forever 21, and the top is made with the same technique I used for my braided skirt. I used recycled t-shirt strips. I recommend using high waist skirts (it's better if they have an elastic waistband), however you can use any skirt you already have, as long as it's not too tight. Now the skirt goes a little bit over my ankle, but it's a quite comfortable lenght. It's perfect to wear it with flat sandals.

And it didn't take much time! I did it in just one morning. Don't miss out all the details of the DIY process in the video. I still haven't learnt how to (easily) add subtitles, so if there's anything you guys don't understand, you can just ask ;)

Hope you guys liked my new DIY maxi dress and my new friend :) Would you guys dare to turn your maxi skirt into a maxi dress?

xxx

Tuesday, June 11, 2013

DIY Inspiration: summer maxi dresses

LEE ESTO EN ESPAÑOL
It might sound weird, but although I wouldn't wear a long skirt (at least, not now) I absolutely love maxi dresses. And it seems this season they're more creative than ever. With such a huge amount of inspiration, I simply had to make my own DIY version of a maxi dress. I'll show you guys the result very very soon!

Meanwhile... What do you guys think? Do you love maxi dresses or definitely hate them? Which one is your favorite one from these?

xxx
Sylvia

Saturday, June 1, 2013

DIY Project: Isabel Marant Inspired Necklace

Hi Everyone!
Here we go with a new DIY tutorial. This time I'm going for a perfect summer accessory inspired by this ethnic necklace by Isabel Marant that you guys can see above these lines. The fact that attracted my attention was the way leather cords are used to buid a structure with pins. Despite being a designer piece, it's not so difficult to make a very similar one at home. Here's how
  
As the video is in Spanish, here are the directions to make your own Isabel Marant inspired DIY necklace, just in case you guys missed something in the video.
Supplies:
* Jewelry pins
* Crystal beads (2 colors): I like this kind of beads better because they are kind of irregular and that provides a nice handcrafted effect. I got them at Michael's.
* Long beads: The ones I used are form Create for less
*Leather cord (Different colors and thicknesses)
* A chain and a jewelry closure
* Round nose pliers

1. Introduce a small yellow bead and a long ornament into a pin. Use the round nose pliers to turn around the other side. You must leave some space on the pin. Repeat this with the half of your pins.
2. Repeat step one with the other half of your pins but use the small crystal beads instead of the long ones.
3. Introduce a leather cord into the hole we've just created on the pins. Alternate the pins with the crystal beads and the ones with the long beads.
4. Introduce a leather cord underneath alternate pins. 
5. Introduce another leather cord and repeat step 4 backwards
6. Twist two thinner leather cords around the other side of the pins
7. Take the the spare cords to the back and tie them with a knot. Seal it with a little bit of contact glue.

And that's pretty much everything :) Hope you guys enjoyed the tutorial and I hope to see your recreations very soon.

Have a nice weekend!

Saturday, May 25, 2013

DIY Project: Boyfriend shirt ress


Hi everyone!
This week I came up with my personal version of a classic DIY: making a dress out of an XXL men shirt. If you have a sewing machine, it won't take so long. This is a very versatile project that will let you explore the boundaries of your creativity. However, I decided to keep it simple... At the end of this post you guys will see some more inspo to make your own boyfriend shirt dress.

The video doesn't have subtitles, but I'll try to fix it: I downloaded a subtitle software but I still don't know how it works. What I'm saying is that this week I came back from Mexico and had a great experience. I got a lot of inspiration there, and also brought some DIY supplies that I'll show you guys in the next couple of weeks. Hope you guys enjoy the video!

Click  HERE to subscribe Dare to DIY's Youtube channel

What do you guys think? Would you dare to kidnap your boyfriend's shirt to make yourself a dress?
Seize weekend! Hope you guys have fun :)

Monday, May 13, 2013

Hypnotic Art

Lee esto en español
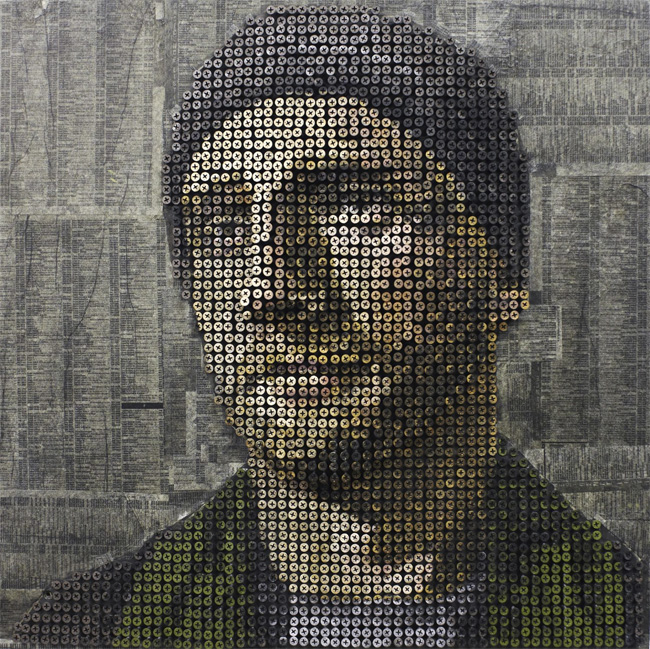
Inspiration should be found at the most unexpected spots. There is where good ideas rise, nearly always after a good research work. Today I want to share with you guys the work from two artists that totally amaze me. They're capable of turning out ordinary objects into hypnotic sculptures that you just can't stop staring.The first one is Jennifer Maestre, who creates volumes with pencils that remind me to otherworldly submarine creatures. On the other hand,  Andrew Myers builds incredible 3D portraits with screws. I'm speechless!
Pictures vía jennifermaestre.com
And here's a cool inspiration for a DIY necklace
Related Posts Plugin for WordPress, Blogger...