Tuesday, September 10, 2013

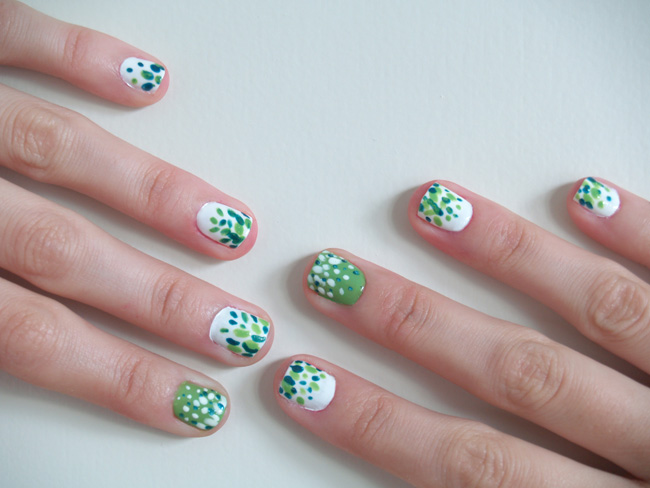
DIY Nail Art: Goodbye Summer!!

Hi everyone!
So this is going to be the first DIY of the week :) I'm resuming my beloved Nail Art and beauty tutorials!! I would love to make many more posts like this, but my nails are so weak... If I attempt to wear them a little bit long, they break and my hands end up looking awful. I've tried everything and I just can't help it! But the length my nails have right now is enough to wear most of the nail art designs. I want to encourage you guys to give a try to Nail Art. It's not as difficult as it seems!! And it could be more relaxing than a kundalini session and more addictive than a Candy Crush marathon!!!

The design I made was inspired by the end of the summer. I hope you guys like it!!


Compartir en Topic

Sunday, September 8, 2013

#MeetDaretoDIY Our DIYer meeting

Lee esto en Español
Last Friday I had the amazing privilege of starring an event at the Apple Store - Passeig de Gràcia, in Barcelona. It was a conference in which I had the chance of sharing with some of you guys the story that's behind this blog (my main blog DaretoDIY.com ) and some of the things I've learnt with this experience.

I was so surprised to see that the reservations were full the day before. But it was even more amazing that a lot of people came in to listen, regardless the list of attendees. I've said this many times before, but this blog has been one of the most rewarding experiences I've ever had. And without a doubt, this event was an amazing gift.

DIY Pollock Impulse dress: One of my very first DIYs and also one of my reader's favorites.

I thought it could be interesting for the attendees to bring in some of my DIYs, so they could see them and touch them. This way I explained a little bit how I came up with the ideas, and some details of the process. 
Skirt with Mexican embroideries (made of a tablecloth), DIY skirt with 400 daisies (hand sewn) , necklace made with a hot glue gunEthnic necklace inspired by Isabel Marant and clutch bag with a California car plate.

Compartir en Topic

Thursday, September 5, 2013

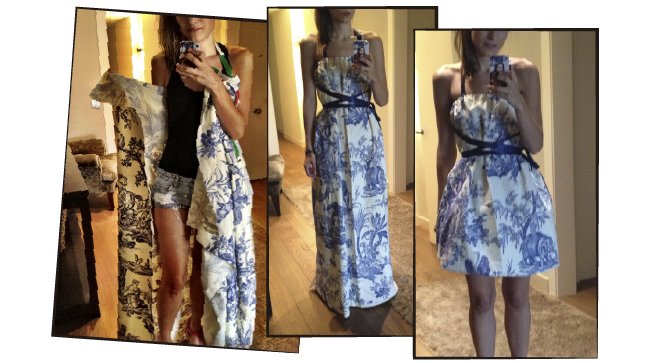
The easiest DIY dress EVER!!

This week I made a very easy DIY, which is prefect for sewing beginners. This is what I call "the easiest DIY dress in the world". Just sew a few straight lines, introduce an elastic band and, voilà! You can also add shoulder straps. Style it with a belt and it's ready to wear!

The hardest part will be to find a fabric you like. Lately I have a soft spot for upholstery fabrics, because they look great on skirts and dresses. And prints are usually much more creative!! Do you guys remember my newspaper print skirt? The best part of this dress is that you can also wear it as a high waist midi skirt. Hope you guys like the video :) You'll see that it couldn't be easier!


During the process I thought of making a maxi dress, but I'm afraid it would have been too much... What do you guys think?

Hope you guys liked it!!

Compartir en Topic

Friday, August 23, 2013

5 Ideas to customize a T-shirt: #3 Transparencies


After changing the sleeves of a T-shirt and making a crop top with a "bow neckline", we are going to play a little bit with textures and transparencies. This could be a simple interpretation of the cut out idea. However, I'll probably make another version of this DIY to go a little bit further with the design. The process of this DIY is so easy and simple. I hope you guys like the video! :)

¡Have a great weekend!


Compartir en Topic

Thursday, August 22, 2013

Wake me up when its all over

Hi everyone!
I'm back in the real life after a short holidays in Ibiza!! It's been an incredible girls trip, we couldn't have had more fun. Now it's time to get down to work! Today I wanted to share with you guys the outfit I wore to spend an unforgettable day in a boat, in the idyllic island of Formentera. I had never been there before, even though I live in Barcelona, which is really close... I was amazed to see those incredible light blue crystalline beaches. I wore a lovely jumpsuit from Romwe and I added a few pops of color with two of my favorite DIYs. Hope you guys like it!

Jumpsuit: Romwe (similar aquí)
Sandals: Melissa for Forever 21
Bikini: Oysho

Compartir en Topic

Sunday, August 4, 2013

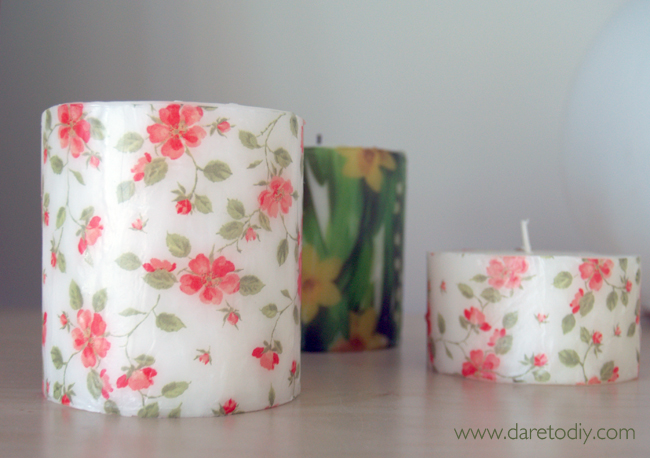
DIY Home: Printed paper Candles

LEE ESTO EN ESPAÑOL
Hi Everyone!

Today I wanted to share with you guys a DIY I did some years ago and I still love it. It's a technique to customize candles with printed paper napkins. It couldn't be easier and it's 100% adaptable to your personal style. You guys will need napkins, candles and an iron. It will take just a few minutes!

We'll apply heat with the iron and melt the superficial layer of wax, that will soak through the paper. By doing this, we'll embed that thin layer of paper within the candle. You guys could try making this with other kinds of paper, but from my point of view, napkins work best. They're so porous and allow the wax to come up to the surface. You'll see it more clear in the video. Hope you guys enjoy and don't forget to subscribe my Youtube channel here.


Isn't it easy? The hardest part will be finding the right napkins. It was much more complicated than I thought, because now, during the summer, most of napkin designs are really tacky...
Hope you guys got inspired! This DIY could have a million interpretations. What about using your own pictures? You could also draw on regular white napkins, or even combine your candles with your plates and napkins on a summer dinner outdoors. Do you Dare to DIY this??

xxx

Saturday, July 20, 2013

DIY Project: Make a clutch bag with a car license plate

READ THIS IN ENGLISH
Here's my new favorite DIY ever!
With the permission of my mexican embroidered skirt... It's simple clutch bag with a zipper closure and I added a car license plate. I love the fact that it's a real and used car plate. And it's so easy to find, you can get it at any souvenirs shop or around the internet, for instance on Ebay.

I was inspired by this Kate Spade bag I saw in a store. I loved the idea, but I was a little bit disappointed with the quality: it looks more like a H&M sale bag than like what a 400$ bag. I would never buy a PVC bag like that, I prefer doing it myself with good quality materials.

Then I got down to work. You could actually make this DIY in five minutes, if you used any bag you already have. I preferred doing it from scratch because I didn't find the perfect bag I envisioned. So here's a basic videotutorial of how to make a zipper leather clutch bag. Hope you guys enjoy!


Supplies
2 leather rectangles (exterior)
2 fabric rectangles (lining)
1 metallic zipper
1 car license plate
4  machine screws 
Textile glue
Pins / double sided tape
Thick sewing machine needles

Tips
Pins always leave a mark on leather. Try o use it on the inner part of the seams, or use double sided tape instead.

The best way of finishing the zipper is sewing the leather piece. I used textile glue because I broke 3 needles in the attempt, as my zipper is metallic.
I can't wait to wear it! Hope you guys liked it as much as I do
What do you guys think? Would you dare to make your own license plate clutch?

Hope you guys have a great weekend! Have fun!

Thursday, July 18, 2013

California dreaming

LEE ESTO EN ESPAÑOL
Hi everyone!
As you guys know, when I do anything that doesn't come out well, I simply try doing it again. That's something I've been saying since my very first post, that's how I am. After the awful experience I had last year with my rollerblades, today I tried skating again. But I didn't skate with an ordinary pair of roller skates... I finally got the colored skates that the whole Pinterest is craving for!! I had many doubts, but it was love at first sight and it was totally worth the risk. Today I went to Mission beach to try my new skates and I totally loved them!

Hope you guys like the pictures and my last last diy :)
Skirt: DIY (originally from H&M)
Roller Skates: Moxi Roller Skates
Bikini: H&M (2012)
DIY ALTERNATIVE
At first I thought of making a DIY, because they're not easy to find outside the US (and I normally live in Barcelona). My idea was to dye a regular pair of white skates with leather dye. It's so easy to find online, I got mine on Ebay. But in the end, as I had the chance of living in California for a few months, I bought my Moxi Strawberry skates.

The dye for shoes is not so difficult to use: just apply a few thin layers of dye with a sponge applicator, using smooth even strokes. It works well on smooth leather, patents, synthetics, canvas and satins. If you don't dare to make it, you can just take your skates to the cobbler.
Hope you guys liked the pictures. And stay tuned, I'm sure you guys are going to love this week's DIY ;)

xxx

Friday, June 21, 2013

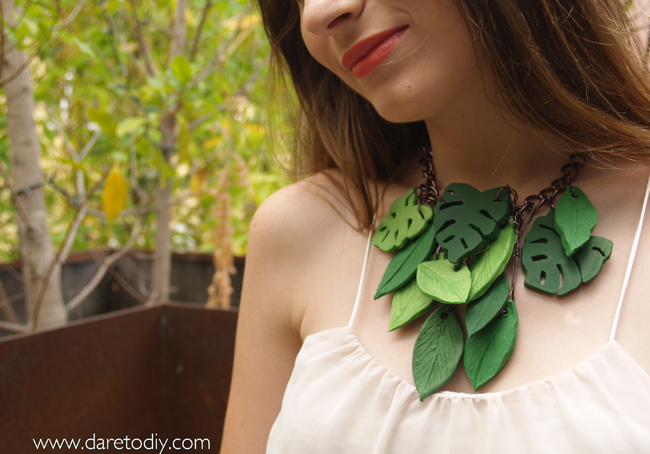
DIY: Tatty divine inspired Sculpey necklace

Hi everyone!
So here's my Tatty Devine inspired necklace. At first I thought of using some sort of plastic, but in the end I chose to use oven-bake clay because it's much easier to find and it's also very easy to work with. My biggest fear, when I started working on this project, was that it could look childish. And I do recognize it didn't came out as I expected on my first attempt. I struggled a little bit with the split leaves... But after trying some different techniques, I can give you some advice.

1. Try to use your fingertips as little as possible: It will be easier to achieve an even and flawless surface if you use modelling tools. You can buy some specific tools for clay, or you can use whatever you already have at home instead. I used a plastic cup, a cuticle remover, a wood stick and some pins and needles.

2. This colored clay might stain your working surface. You'd better work on metal or crystal surfaces.

3. Baking: Every brand has its own baking instructions. You'll usually have to bake your clay for 20-35 minutes, depending on how thick your pieces are. The oven must be preheated to 130ºC / 275ºF. Do not use the microwave!


THANKS FOR YOUR SUPPORT!
Hope you guys enjoyed and had a great time watching! Don't forget to send me pictures of your recreations, you can e-mail me (info@daretodiy.com), tag me on Twitter (@Daretodiy) or on Instagram (@sylvia_Daretodiy).

xxx
Related Posts Plugin for WordPress, Blogger...