Showing posts with label other DIYs. Show all posts

Tuesday, February 4, 2014

DIY Decor: Office Makeover

Hi everyone!!
Last Sunday some of you guys saw me on Instagram drawing on a wall. Yes I know that sounds weird ;) I couldn't wait to show you the final result!!

So here's how this crazy project started: A few weeks ago, the guys from Crows & Dogs asked to give them a hand in their office decoration. They're a young (and amazingly talented) group of entrepreneurs who created their own creative digital agency a year ago in Barcelona. Since then, they've launched super cool projects such as Topic, a social network in which you can follow the subjects you like instead of following people. 

They are struggling to raise their company, so everything had to be DIY and low cost. We had to use our inventiveness! You don't have everyday the chance of doing something different and creative (nor you have a blank wall to paint whatever you like). So I instantly said yes!! The process was exhausting, but I had so much fun. ¡Hope you guys enjoy the video!


Previous draft of our virtual kitchen =D
For the meeting room we decided to wallpaper the main wall (the one you see from the door, that makes the first impression) with international newspaper sheets. We used wallpapering glue and applied a few layers of paper. As we combined different sizes, languages and directions, we got a very interesting effect. On the next wall we painted some fake frames to keep up with the idea of the trompe l'oeil we did in the kitchen. However, the frames are still in process. We'd like to fill them up to get something similar to this. But it will take time...
What do you guys think? What's your favorite part of this Office Makeover?


If you liked the post, please share it on your social networks. Thanks for your support!
Compartir en Topic

Sunday, August 4, 2013

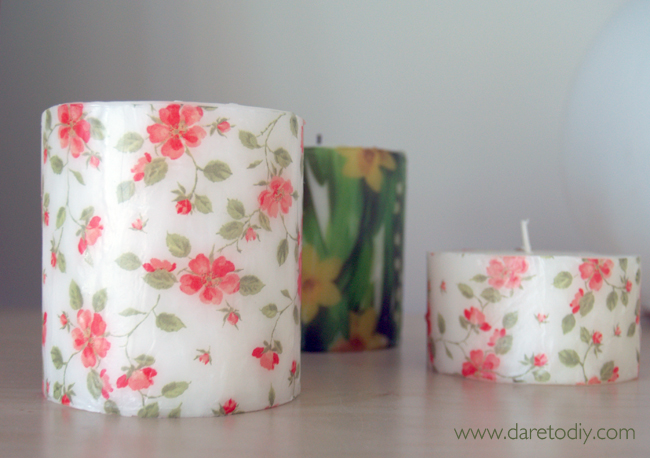
DIY Home: Printed paper Candles

LEE ESTO EN ESPAÑOL
Hi Everyone!

Today I wanted to share with you guys a DIY I did some years ago and I still love it. It's a technique to customize candles with printed paper napkins. It couldn't be easier and it's 100% adaptable to your personal style. You guys will need napkins, candles and an iron. It will take just a few minutes!

We'll apply heat with the iron and melt the superficial layer of wax, that will soak through the paper. By doing this, we'll embed that thin layer of paper within the candle. You guys could try making this with other kinds of paper, but from my point of view, napkins work best. They're so porous and allow the wax to come up to the surface. You'll see it more clear in the video. Hope you guys enjoy and don't forget to subscribe my Youtube channel here.


Isn't it easy? The hardest part will be finding the right napkins. It was much more complicated than I thought, because now, during the summer, most of napkin designs are really tacky...
Hope you guys got inspired! This DIY could have a million interpretations. What about using your own pictures? You could also draw on regular white napkins, or even combine your candles with your plates and napkins on a summer dinner outdoors. Do you Dare to DIY this??

xxx

Friday, June 21, 2013

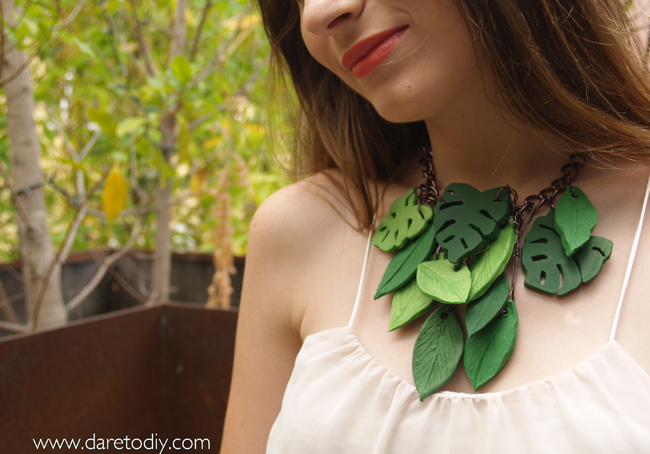
DIY: Tatty divine inspired Sculpey necklace

Hi everyone!
So here's my Tatty Devine inspired necklace. At first I thought of using some sort of plastic, but in the end I chose to use oven-bake clay because it's much easier to find and it's also very easy to work with. My biggest fear, when I started working on this project, was that it could look childish. And I do recognize it didn't came out as I expected on my first attempt. I struggled a little bit with the split leaves... But after trying some different techniques, I can give you some advice.

1. Try to use your fingertips as little as possible: It will be easier to achieve an even and flawless surface if you use modelling tools. You can buy some specific tools for clay, or you can use whatever you already have at home instead. I used a plastic cup, a cuticle remover, a wood stick and some pins and needles.

2. This colored clay might stain your working surface. You'd better work on metal or crystal surfaces.

3. Baking: Every brand has its own baking instructions. You'll usually have to bake your clay for 20-35 minutes, depending on how thick your pieces are. The oven must be preheated to 130ºC / 275ºF. Do not use the microwave!


THANKS FOR YOUR SUPPORT!
Hope you guys enjoyed and had a great time watching! Don't forget to send me pictures of your recreations, you can e-mail me (info@daretodiy.com), tag me on Twitter (@Daretodiy) or on Instagram (@sylvia_Daretodiy).

xxx

Saturday, June 1, 2013

DIY Project: Isabel Marant Inspired Necklace

Hi Everyone!
Here we go with a new DIY tutorial. This time I'm going for a perfect summer accessory inspired by this ethnic necklace by Isabel Marant that you guys can see above these lines. The fact that attracted my attention was the way leather cords are used to buid a structure with pins. Despite being a designer piece, it's not so difficult to make a very similar one at home. Here's how
  
As the video is in Spanish, here are the directions to make your own Isabel Marant inspired DIY necklace, just in case you guys missed something in the video.
Supplies:
* Jewelry pins
* Crystal beads (2 colors): I like this kind of beads better because they are kind of irregular and that provides a nice handcrafted effect. I got them at Michael's.
* Long beads: The ones I used are form Create for less
*Leather cord (Different colors and thicknesses)
* A chain and a jewelry closure
* Round nose pliers

1. Introduce a small yellow bead and a long ornament into a pin. Use the round nose pliers to turn around the other side. You must leave some space on the pin. Repeat this with the half of your pins.
2. Repeat step one with the other half of your pins but use the small crystal beads instead of the long ones.
3. Introduce a leather cord into the hole we've just created on the pins. Alternate the pins with the crystal beads and the ones with the long beads.
4. Introduce a leather cord underneath alternate pins. 
5. Introduce another leather cord and repeat step 4 backwards
6. Twist two thinner leather cords around the other side of the pins
7. Take the the spare cords to the back and tie them with a knot. Seal it with a little bit of contact glue.

And that's pretty much everything :) Hope you guys enjoyed the tutorial and I hope to see your recreations very soon.

Have a nice weekend!

Thursday, February 28, 2013

DIY Project: romantic headband

Lee esto en Castellano
I don't give up my personal quest of spreading DIY lifestyle. In order to do so, this week I came up with a very easy project but also very eye-catching. There's nothing more rewarding than being asked about where to buy something you did yourself. This why I'm always encouraging you guys to stop saying things such as "I can't do it" and to start trying.

This week's inspiration is a real luxury. I don't usually do this kind of DIY's (seeing an inspiration and doing it just alike). But I simply fell for this Eugenia Kim headband the moment I saw it. I think it's so pretty for any spring event. When I eventually came across these rubber bugs I couldn't help it! I simply had to do it.

The inspiration
Insects from the Bioexplorer collection from the spanish toy store Imaginarium (1 €/ud)
You'll be able to find the most important supply for this DIY in toy stores. The project itself couldn't be easier: just glue the bugs with a hot glue gun and paint it with spray paint. That's all. Here's the video so you can see how simple it is.
Which kind of spray paint should I use?
I made this DIY a few weeks before the XL necklace from last week, but I had some problems with the paint. This is why I couldn't show it to you guys until now. I used silvered acrylic spray paint and two weeks after it was still wet! I couldn't be more disappointed. In the end I had to clean all the paint up and start over with another kind of paint. The second time I went for a matte synthetic spray paint. Happily, it all turned out well.
Important

1. Don't try to get a full coverage at once. It's better to apply a few thin layers. 

2. Don't use acrylic spray paint on plastic or rubber. Synthetic spray sets better and looks nicer.

Hope you guys liked it!
xxx

Thursday, October 25, 2012

DIY project: leather and studs necklace

Lee esto en Castellano
You know what? I've been dying for weeks to show you guys this DIY. I even had this picture ready to be posted on Instagram (sylvia_daretodiy)... But I've had to contain myself until today, because this project is the result of my first collaboration with DaWanda. It's a website that allows designers and artists to sell their products online. And so, it is also a great place to find unique and handmade products. When they asked me to collaborate with their DIY blog I just couldn't say no.

Click here for the full DIY tutorial

Hope you guys like this DIY, it's a great idea for a Christmas gift. In fact, I made another necklace like this for my best friend's birthday and she loved it, at least that's what she told me ;)

xxx

Monday, May 7, 2012

Mini DIY: playing with nail polish

Hi guys! As I told you, I'll be doing during these weeks a few smaller DIY's. Today I'm bringing you the second one from that series.

It is a very simple idea; I had this necklace since some time ago, but I wanted to make it more wearable for the summer. So I decided to paint it with nail polish. Probably most of you guys have already done any DIY like this, using polish. I think this is one of the most suitable paints for any fashion craft. Even tough over our nails, most of times doesn't last so long, over surfaces such as plastic or metal works really well. It resists scratches, doesn't fall off and doesn't wear out, as it happens in nails. To achieve a perfect finish, you'll need to apply a few layers. The final result looks shiny, even, and without brush marks. However, note that the thicker the polish is, the worse it will look. So you'd better buy a new nail polish or use one liquid enough.
At first I tried mixing a few colors, but in the end I removed them all and painted the necklace only yellow. This is one of the best things of this DIY: if you don't like the result or just get bored of the color, you can always remove the paint with nail polish remover.

Some kinds of acrylic paint can also work well, but you'll probably need to put a few layers of varnish to prevent scratches. I tried a few weeks ago to do something similar with spray paint and the result didn't look as I expected, probably I didn't have the right spray...

I hope you guys liked this. What do you think? Have you ever used nail polish for a DIY? Have you done anything similar in another way?

xxx
Sylvia

Wednesday, March 14, 2012

DIY project: Elbow patches


During this season I've seen elbow patches everywhere, so could not let scape the opportunity of doing my own DIY interpretation of this trend. I love the ones with non traditional shapes and colors, I've left some inspirational pics at the end of this post.

This is the first DIY I do with leather. I love this material, it's so inspiring for me and I promise I'll do a lot more projects using it. I'm planning to do a bag during the next weeks, but I'm trying to find a way of doing it without using the sewing machine, so everybody will be able to follow up.

What's great about leather is that it's not too expensive, contrary to what most of people may think. It's quite easy to find unexpensive remnants. Actually, the piece I'm using here was less than five euros, and I just needed the half of it. I recommend using real leather, as those DIYs take a while and it's not worth it to work with faux leather. Anyway, you are free to use whatever you want.

Materials:
_ Leather, thermal adherence elbow patches (as thin as possible), thin fusing, scissors and textile glue (I use Gütermann's).
It's not necessary to cut the strips so accurately, when you weave them, little differences won't be seen. Moreover, if you use different widths of strips, you'll get a nice effect.
The fusing I put on the back of the patch works as a base for the glue, and it helps the patch to stick to your jacket. Put a pice of fabric or card inside the sleeve and stick the patch with glue.

Inspiration for Elbow Patches
Honestly WTF       y      A beautiful Mess


Related Posts Plugin for WordPress, Blogger...